Mosaics and mosaic making information from The
joy of shards Mosaics Resource
The reverse method of making mosaics

The reverse, or indirect, method is more complicated than the direct method, but is very useful in many situations. The mosaic mermaid was made using this technique, and this page will explain how the technique works. You can find more details of each stage throughout the project.
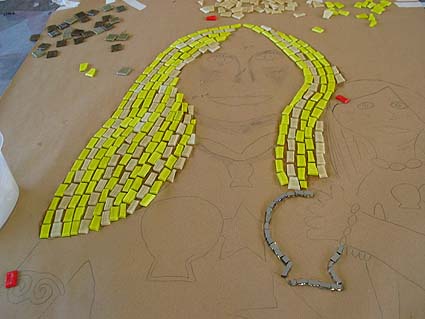
As the name suggests, the mosaic is built up in reverse, and involves using a temporary surface (brown paper) to transfer the mosaic to another location. Notice that in the finished piece, the baby mermaid is on the left of the picture. In the picture below, the design has been drawn on to brown paper in reverse (a mirror image), with the baby on the right. An advantage is that this allows the detail of the design to be seen while the mosaic is being made. If you were putting the tiles into an adhesive paste spread out over the surface, the pencil lines would be covered up!
The tiles are stuck to the paper upside down. Glass mosaic tiles have a flat surface (which will appear in the final mosaic) and an uneven surface (designed to grip to adhesive). It is the flat surface which is being stuck to the paper. A water-soluble glue, such as soluble craft glue or wallpaper paste, is used. It is easy to see if the pieces are in the right place because the tiles are more or less the same colour on front and back. This starts to be a problem with ceramic tile, for example, where the back of the tile doesn't give much clue as to the colour on the front - it can be hard to spot a misplaced tile until much later. In this case, mirror glass is being used for the outline of the swimsuit - the reflective side is face down and the grey backing can be seen.
Another advantage of this method is that a large design can be divided up into several sections which can be worked on by different people. For this project there were four separate sections, and the paper was trimmed to the edges of them when the work of sticking the reversed pieces in place was finished. Once the glue is dry, the paper and mosaic sheets are very robust.
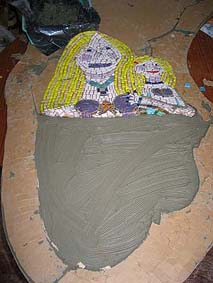
A layer of adhesive is spread where the mosaic is going to be situated. In this case it was a wooden board, but it might be a wall or floor. The sections of mosaic on brown paper are pressed into the adhesive, tile side down. In this picture the other sections have been fitted into place and the mermaid is about to go, literally, face down in the adhesive.
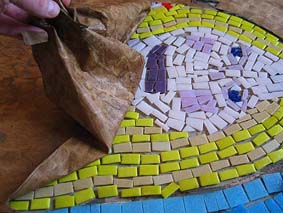
When the adhesive has set fully, the paper can be sponged with water. The water soaks through the paper and dissolves the wallpaper paste or glue, allowing the paper to be peeled off. This reveals the mosaic with the flat sides of the tiles showing (and the baby mermaid on the left again). The tiles are embedded in the layer of adhesive and now need to be grouted to fill the remaining gaps.
Another way of using the indirect method would be to make a paving stone (where a flat surface is needed). The tiles are stuck down to paper as above. When dry, a mould is placed over the mosaic and filled with a mortar or concrete mix, to create a slab containing the mosaic (still face down). This is given plenty of time to set, released from the mould and turned over. The paper is soaked off and the front of the mosaic is grouted.