
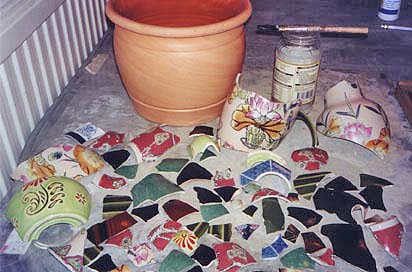
The starting point here is a terracotta
planter and a collection of broken crockery. The planter will
be used indoors and is varnished on the inside. For the porous
outside of the pot I've applied some diluted PVA (white craft)
glue to reduce the amount of water which the terracotta will draw
from the adhesive and grout. I've started to snip up the crockery
using tile nippers, but there's more work to be done. The smaller
the pieces, the more snug they will fit to the curved surface,
but for this design I'd like to keep the shards as large as I
can.
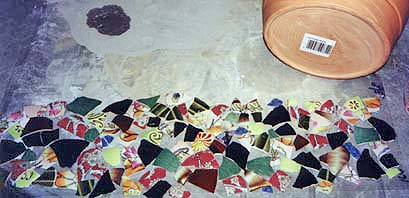 Now the shards are at the right sort of
size. I've measured the surface area of the planter and laid out
the shards to make sure I've got enough. On a plastic sheet I've
put a pile of grey cement-based grout powder, which I'm going
to use as the adhesive. Always take great care when using cement-based
products.
Now the shards are at the right sort of
size. I've measured the surface area of the planter and laid out
the shards to make sure I've got enough. On a plastic sheet I've
put a pile of grey cement-based grout powder, which I'm going
to use as the adhesive. Always take great care when using cement-based
products.
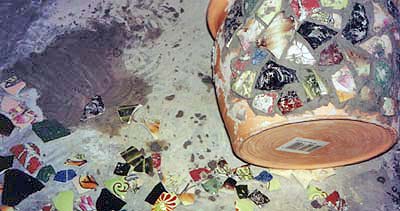 Wearing
rubber gloves I put a blob of the grout in the cavity of each
curved shard and press it onto the planter. Usually the grout
will have enough "grab" to allow you to work steadily
round an object like this without the shards falling off. However,
if they are slipping you'll have to wait while they set. Be careful,
too, that they are secure before you turn the pot to rest on areas
you've already mosaicked. When the whole planter is covered, allow
the cement to set thoroughly. However, if you can remove any grout
which is on the surface of the shards at this stage, life is easier
later. It's good to let cement set slowly, so covering the work
in a plastic bag will help.
Wearing
rubber gloves I put a blob of the grout in the cavity of each
curved shard and press it onto the planter. Usually the grout
will have enough "grab" to allow you to work steadily
round an object like this without the shards falling off. However,
if they are slipping you'll have to wait while they set. Be careful,
too, that they are secure before you turn the pot to rest on areas
you've already mosaicked. When the whole planter is covered, allow
the cement to set thoroughly. However, if you can remove any grout
which is on the surface of the shards at this stage, life is easier
later. It's good to let cement set slowly, so covering the work
in a plastic bag will help.
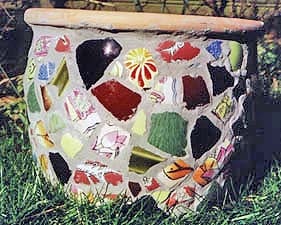 Finally,
grout the pot with more of the same cement-based mix.
Finally,
grout the pot with more of the same cement-based mix.
|
|
|